Baroody's Game Development Site
A Website to help you program computer games
Step 3: Moving the Pieces
Well, now that we have all the "set up" done, we need to be able to move the pieces, right? Let's see how we might go about that.
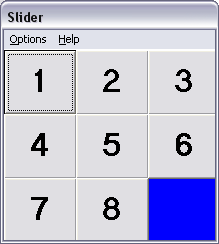
Remember that we set up the game pieces as a command button array. That means that we can have one sub routine that will figure out which piece we want to move and to where it should be moved (why?....because we will have the index number of the particular command button entered). Now in order to determine where to move a piece, it is also important to know where the empty space is, right? For instance, if the empty space is in position 9 (bottom right), then the only two pieces that can move are in positions 6 and 8. The piece in position 6 can only move down and the piece in position 8 can only move to the right. See the diagram below and think about it...it should make sense:

If the empty space is in position 8, then three pieces can move. The one in position 5 can only move down, the one in position 7 can only move to the right, and the one in position 9 can only move to the left. See the diagram below to see what I mean (note that the piece in position 9 has a label of "8" - the label and the position are different...this is key!):

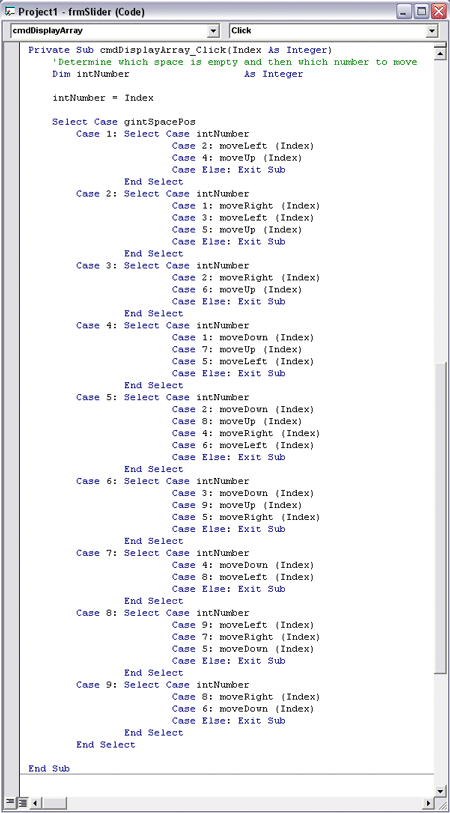
As you can see, the potential moves are completely dependent on where the empty space is located. In fact, there are a finite number of moves (anywhere from 2 to 4) that can be made for a given empty space position. This situation calls for a new Visual Basic coding structure called a SELECT...CASE statement. Take a look at the following code:

This may look long and confusing, but it's really no different than the decision making we were talking about. We start by placing the Index number of the cmdDisplayArray command button pressed into a temporary variable (intNumber). Now, we say
Select Case gintSpacePos
Case 1:
Case 2:
...
End Select
This code says to look at the variable gintSpacePos. If it's value is "1," then perform the code after Case 1, if it's value is "2," then perform the code after Case 2, etc. That's not so bad, right? We know that the value of gintSpacePos can only be a number from 1 to 9 (there are only 9 possible piece positions), so this should work. Note, that if you don't have a finite number of possibilities like we have here, then you can't use a SELECT...CASE statement.
OK, so now what happens if the empty space is in Position 9 like it is at the start of a game? Let's look at the code after the Case 9:
Select Case intNumber
Case 8: moveRight(Index)
Case 6: moveDown(Index)
Case Else: Exit Sub
End Select
So, I guess we could call this a nested SELECT...CASE, huh? Let's not worry about that for now...let's just see if we can understand this code. intNumber has the Index number of the command button pressed. So, if that is 8, then we move that piece to the right. If the command button was in position 6, then we move it down. That's just what we said we needed to do if the empty space was in Position 9, right? Cool! If you look at the rest of the code presented here, you should see that all of the possibilities are considered.
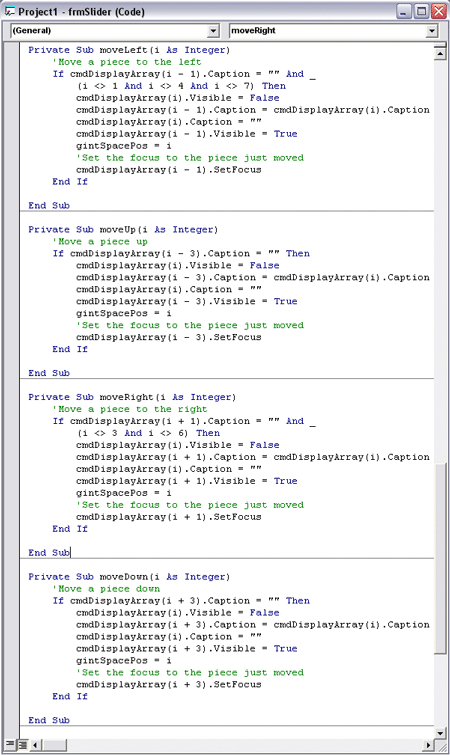
OK, now, we just need to code those "move" functions. Take a look at the following:

Again, it looks like a lot of code, but it's not so bad for each section. Let's just look at the moveRight routine...the others are very similar.
Here's what we do:
-
We check to make sure that the space to the right of the current one (i + 1) is empty (.Caption = "") and that we are not trying to move either Position 3 or Position 6 - the ones on the ends of Row 1 and Row 2.
-
Assuming that this is true, we make the current command button position (i) invisible
-
Then we make the caption of the command button to the right (i + 1) equal the current command button caption.
-
Next, we clear out the current command button caption
-
Then, we make the command button to the right visible.
-
Finally, we reset the current space position to the current position (i), and
-
Set the focus onto the position to the right.
Again, it's not so bad when you take the time to look at it, is it?
You should finish coding the other "move" routines and test everything. You should be able to move the pieces wherever you want, but the game will never indicate that it's done. If you're ready to add that code, click here or select Step 4: End the Game on the navigation bar.