Baroody's Game Development Site
A Website to help you program computer games
Step 1: The Form
The first thing to do is to set up the form. Once we've done that, we'll tackle the code. Start up Visual Basic and create a new "Standard.exe" file. Select Form 1 and change the following properties as indicated:
|
Property |
Value |
|
(Name) |
frmTicTacToe |
| Caption | Tic Tac Toe! |
| BackColor | &H80000002& ("Active Title Bar") |
| Height | 7035 |
| MaxButton | False |
| MinButton | False |
| Width | 5310 |
It should be pretty clear what each of these properties does..nothing really special here, right?
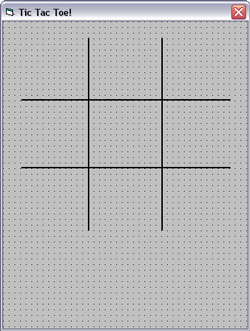
Now, you need to add the grid. In order to do this, use the Line tool (it's in the toolbox on the left of the VB workspace) to create four lines that intersect to form the nine grid spaces. You can use your own properties for these lines, or you can use the following properties, which will give you something that looks just like my game.
|
Property |
Value |
|
(Name) |
Line1 |
| BorderWidth | 2 |
| X1 | 1808 |
| X2 | 1808 |
| Y1 | 345 |
| Y2 | 4425 |
| (Name) | Line2 |
| BorderWidth | 2 |
| X1 | 3368 |
| X2 | 3368 |
| Y1 | 345 |
| Y2 | 4425 |
| (Name) | Line3 |
| BorderWidth | 2 |
| X1 | 368 |
| X2 | 4808 |
| Y1 | 1665 |
| Y2 | 1665 |
| (Name) | Line4 |
| BorderWidth | 2 |
| X1 | 368 |
| X2 | 4808 |
| Y1 | 3105 |
| Y2 | 3105 |
Your form should now look like this:

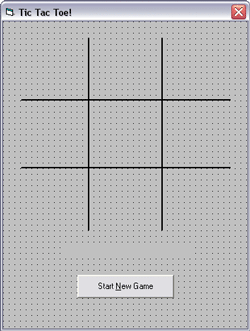
Next, you want to add a label (in which we'll display messages like "Player 1's turn") and a command button, which will be used to start a new game. Again, you can put these where you want, or you can use the properties I've shown below:
|
Property |
Value |
|
(Name) |
lblPlayer |
| BackColor | &H80000002& ("Active Title Bar") |
| Caption | "" |
| Height | 255 |
| Left | 1208 |
| Top | 4785 |
| Width | 2775 |
| (Name) | cmdStartNew |
| Caption | Start &New Game |
| Height | 495 |
| Left | 1568 |
| Top | 5385 |
| Width | 2055 |
Your form should now look like this:

Now for something you probably haven't done before. We're going to create an array of image controls. Trust me on this...it will make your code way less complex and infinitely easier to maintain. In fact, arrays are one of the most useful things to know how to use in programming. In later game programs (and in other programs in general), you'll use them over and over again. So...make sure you understand them! Here's what to do:
Create an image and place it in the upper left corner of the grid. Call it imgGrid and set the "Stretch" property to "True." Now, select imgGrid and copy (CTRL + C) and paste (CTRL + V) it onto the form. When you do this, you'll get a dialog box with a message that says:
"You already have a control named 'imgGrid'. Do you want to create a control array?"
Make sure to select "Yes" in this dialog box. When you do this, take a look at the image created. Notice that it's name is imgGrid(1). If you look at the original image, it will now be called imgGrid(0). The number in the parentheses indicates which position in the image control array this image represents. You'll understand more about this when we start writing the code...for now, just make sure you've got it set up correctly.
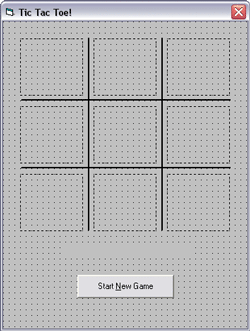
Move imgGrid(1) to be in the middle position of the top row of the grid. Copy and paste this to create imgGrid(2), which will go in the right position in the top row of the grid. Continue this process so that you have nine images in your array, numbered 0 to 8. imgGrid(3) will be in the left position of the middle row, imgGrid(4) in the middle position of the middle row, and so forth. If you continue the pattern, imgGrid(8) will be in the right position of the bottom row.
Your form should now look like this:

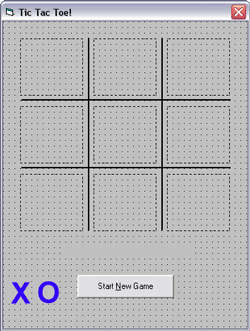
One last thing. You need to add two images, both of which will be "invisible." These are the images for the "X" and the "O" which will be placed in the boxes when players click on them. So, download these two files (XX.bmp and OH.bmp) into your project library, and then add two image controls with the following properties (you can put them wherever you want or use the values for the Left and Top properties I've provided below).
|
Property |
Value |
|
(Name) |
imgX |
| Left | 120 |
| PIcture | Navigate to the XX.bmp file |
| Top | 5520 |
| Visible | False |
|
(Name) |
imgO |
| Left | 720 |
| PIcture | Navigate to the OH.bmp file |
| Top | 5520 |
| Visible | False |
Your form should now look like:

That's it for the form! If you're ready to start the code, then click here or select Step 2: Setting Up on the navigation bar.